
RC4 glossary terms are referenced throughout the Knowledge Base. Within any article, hover over a linked word to see the definition as a tool tip. Click the word to see the definition in a separate web page. Don’t hesitate to suggest additional terms you would like us to add. Terms are sorted numerically/alphabetically. Definitions within the list below are excerpts. Click the word for the complete definition in a new webpage:
Please click on a number or letter above to naviguate the glossary
- 16-bit raw
One DMX channel provides 8-bit digital resolution, which is 256 steps. Ganging two channels together provides 16-bit resolution, which is 65,536 steps and is much smoother when dimming LEDs. You can think of this as coarse and fine channels controlling a single load, where the fine channel provides 256 levels within one value of the coarse channel. The RC4 16-bit raw dimmer curve provides this functionality using two consecutive channels in the DMX universe. An option is provided to use the channels in either order.
- AC synth
AC synthesis is the creation of alternating current (AC) using direct current (DC) electronics and special software. In RC4 Series 3 dimmers, this is done using two 2 DC dimmers in tandem. AC power is needed to make a telephone ring, or make EL wire light up. It is the kind of power that comes from a regular power outlet in a home or office. DC power is what comes from a battery.
- AC wave generator
An AC wave generator creates alternating current (AC) using direct current (DC) electronics and special software. In RC4 Series 3 dimmers, this is done using two 2 DC dimmers in tandem. AC power is needed to make a telephone ring, or make EL wire light up. It is the kind of power that comes from a regular power outlet in a home or office. DC power is what comes from a battery.
- artifacting
Artifacts are unwanted effects on film or in videos, like wagon wheels that appear to slowly spin backwards, even though they were spinning rapidly forward. Another term for this is “beating.” It is caused by interference between the rate something is actually changing in real life and the rate at which it is being captured. If an LED dimmer uses pulse-width-modulation (PWM) for dimming, it is actually flickering the LED faster than eyes can see. Unless it is very fast, it is not faster than a camera can see. The result will be visible artifacts. The most common artifacts caused by PWM dimming on camera are “banding” and “strobing.”
- Auto mode
An RC4Magic Series 3 or RC4Magic-900 DMXio transceiver can operate as either a transmitter or a receiver. These modes can be manually selected, but the default is Auto Mode. In this mode, the device automatically determines which mode it should be in. Connect DMX data to a DMXio and it will be a transmitter. Any other DMXio will find the transmitted signal and become a receiver. This works because RC4Magic devices use private system IDs, ensuring that your receivers can never detect or act on signals from other systems.
- Auto/RX/TX button
On RC4Magic Series 3 and RC4Magic-900 DMXio transceivers, the Auto/RX/TX button cycles through modes. Each device can operate as either a receiver (RX) or a transmitter (TX). In Auto Mode, which is the default setting, the DMXio automatically determines which mode it should be in. Connect DMX data to a DMXio and it will be a transmitter. Any other DMXio will find the transmitted signal and become a receiver. It is rare that a device would need to be forced into receiver or transmitter mode, but some system operators may prefer to eliminate any possibility of a device changing it’s role within an installation.
- banding
Banding is one of several different kinds of unwanted artifacts seen on film or video.
- blink pattern
RC4 Wireless devices use small colored LEDs to indicate various modes of operation. In addition to indicators simply being on or off, they can blink at different speeds or blink with patterns that indicate a particular setting or parameter value. For example, an indicator might indicate 1 short blink, or 2 short blinks followed by a pause, or 3 short blinks followed by a pause to indicate different options or selections.
- bump button mode
When an RC4 Wireless Series 3 dimmer does not see a DMX data input, the Set buttons operate as bump buttons. This is called bump button mode.
- bump buttons
A bump button temporarily turns on a dimmer output for testing. On RC4 Series 3 dimmers, the Set A, Set B, Set C, and Set D buttons act as bump buttons when there is no DMX data signal present. This makes it easy to build and test a prop or set piece without the need for a working transmitter and DMX controller.
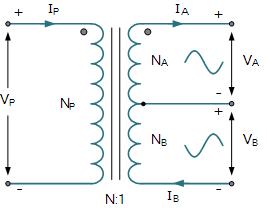
- center tap transformer
A transformer is an electrical power component consisting of two coils of wire wrapped around an iron core. A basic transformer has four wires: the two ends of each coil. If additional wires are added to points within one of the coils, these are called taps. A tap in the middle of a coil is a center tap. If the center tap is used as a reference point, electric current at one end will be the opposite of the other end — when one is positive, the other is negative, and vice versa.
- channel mask
RC4Magic-900 and RC5 EASS systems use Frequency Hopping Spread Spectrum to wirelessly transmit data. Each small packet in a data stream is transmitted on a different radio channel. The specific channels that are used can be selected by the RC4 user with the channel mask settings.
RC4Magic-900 has 63 channels available, of which 25 are required to be used to meet FCC regulations. RC5 EASS has 101 channels available, of which 50 must be used. For each of these systems, a different default channel mask is usually used with each different system ID (ID0, ID1, ID2, and ID3). For additional data security, a custom channel mask can be created. An Excel spreadsheet is available to assist with creating custom channel masks for RC4 systems that use them.
- chip type
Each individual element of a pixel string is a group of LEDs (usually red, green, and blue) along with a chip (an integrated circuit, or IC) to control them. Each chip has an identifying part number. The most popular pixel chip is WS2812. Others are WS2811, APA102, and APA104. New chip types are being developed all the time. The RC4 DMXpix and LumenDimPix can support new chips by updating firmware.
- CodeLoader cable
The RC4 CodeLoader cable connects any RC4 Series 3 device to a USB port on a computer. Together with RC4 CodeLoader software it is used to update firmware. When used with RC4 Commander software, any RC4Magic Series 3 and RC4Magic-900 can be used as a dongle and be connected to the PC with a CodeLoader cable. Purchase a CodeLoader cable.
- CodeLoader mode
When any RC4 Series 3 device is powered on with the Func (function) button pressed, it enters CodeLoader mode and is ready to receive a firmware update via RC4 CodeLoader cable. If no firmware update begins within 5 seconds, CodeLoader mode is terminated and the device operates normally.
- color order
Each individual element of a pixel string is a group of LEDs (usually red, green, and blue) along with a chip (an integrated circuit, or IC) to control them. Not all pixel strings and chips present the colors in the same order. While industry standard is RGB (red, then green, then blue), a pixel string could present colors in any order. Particularly common are GRB (green, red, blue). The RC4 DMXpix and LumenDimPix can re-order the colors so that any string can behave as RGB, regardless of what the actual hardware does.
- COM Port
COM (Communication port) is the original, yet still common, name of the serial port interface on IBM PC-compatible computers. It might refer not only to physical ports, but also to virtual ports, such as ports created by USB-to-serial adapters. The RC4 CodeLoader cable is one of these adaptors, and the RC4 XStick Dongle contains one internally.
- common positive
When the incoming positive (+) power supply terminal is directly connected to the positive output terminal of a dimmer, this is a common-positive dimmer. The actual dimming happens on the negative (-) terminal, so the incoming negative power supply goes to the dimmer circuitry, and then the dimmer drives the negative output terminal of the dimmer. All RC4 Wireless dimmers are common positive, which also means that all the positive (+) terminals on the device are connected together inside. This is ideal for most LED tape, which is also common-positive: connect the common wire to any Dim+ terminal, and connect each separate color wire to a Dim- terminal.
- connect RF button (CRMX)
On RC4 LumenDim devices, the Connect RF button, sometimes also called the RF Connect, or RFcon button, is used to pair and unpair CRMX transmitters and receivers. LumenRadio devices call this the Link Button. The LumenRadio quickstart guide provides more information.
- connect RF button (W-DMX)
On RC4 W-DIM devices, the Connect RF button, sometimes also called the RF Connect, or RFcon button, is used to pair and unpair W-DMX transmitters and receivers. Wireless Solutions W-DMX devices call this the Function Button.
- control voltage
Control Voltage, also called CV, and 0–10V Control, is one of the earliest and simplest electronic lighting control signaling systems. The control signal is a DC voltage that varies between zero and ten volts. The controlled lighting should scale its output so that at 10V, the controlled light should be at 100% of its potential output, and at 0 V it should at 0% output (i.e., off). Wikipedia provide more information.
- COP LED
COP means Computer Operating Properly. On RC4 devices, the COP LED is an indicator that is constantly changing in some way to indicate the firmware is running and the device is functional. In some cases, the COP uses blink patterns to provide additional information.
- crossfade mode
RC4 dimmers are often used to control color temperature of LED motion picture lighting. This is done by combining cool-white and warm-white light sources. When only the cool LEDs are on the color temperature value is highest (around 7000 Kelvin); when only the warm LEDs are on, the color temperature value is lowest (around 3000 Kelvin). If both sources are mixed equally, the color temperature is in the middle (around 5000 kelvin). It’s important that the total light output (measured in Lumens) is always the same. RC4 Series 3 dimmers provide cross fade mode for this purpose.
- DC motor bi-directional
The direction that a DC motor spins is determined by the polarity of the power applied to it. To change the speed and direction of a DC motor, the power level and the polarity must both be controlled. A bidirectional motor controller provides this functionality.
- decrement
To decrease a quantity by a fixed numeric value.
- Digital Persistence
Digital Persistence is a feature in all RC4 dimmers. When used with LED light sources, it emulates the way a traditional tungsten lamp behaves when power is applied and removed. The filament in those lamps take time to heat up and produce white-hot light output. Similarly, they take time to cool off and stop producing visible light. The larger the bulb or lamp, the longer this takes. The characteristics of these rises and falls are very familiar and are not linear. Digital Persistence with RC4 dimmers provide more natural looking LED brightness transitions, with a range of 8 speeds to choose from.
- Dim A minus (-)
Every RC4 dimmer output has two terminals. The minus, or negative (-) terminal is the one that is being modulated by the dimmer electronics. The other is the plus, or positive (+) terminal.
Dim A minus (-) is the second connection point for bare wires on an RC4 device, located between the Dim A plus (+) and Dim B plus (+).
- Dim B minus (-)
Every RC4 dimmer output has two terminals. The minus, or negative (-) terminal is the one that is being modulated by the dimmer electronics. The other is the plus, or positive (+) terminal.
Dim B minus (-) is the fourth connection point for bare wires on an RC4 device, located beside the Dim B plus (+) terminal.
- Dim C minus (-)
Every RC4 dimmer output has two terminals. The minus, or negative (-) terminal is the one that is being modulated by the dimmer electronics. The other is the plus, or positive (+) terminal.
Dim C minus (-) is the sixth connection point for bare wires on an RC4 device, located beside the Dim C plus (+) terminal.
- Dim D minus (-)
Every RC4 dimmer output has two terminals. The minus, or negative (-) terminal is the one that is being modulated by the dimmer electronics. The other is the plus, or positive (+) terminal.
Dim D minus (-) is the last connection point for bare wires on an RC4 device, located to the left of Dim D plus (+).
- dimmer curves
An instrument’s dimming curve is simply how bright the light is in relation to the level of the associated DMX channel.
A good dimmer should be perceived by your eye to be smooth and linear: if you set a light level of 50%, the lamp should appear to be half as bright as it does at 100%. Not all light sources are inherently linear like this.
For example, to make a LED look like it’s at half brightness, the power going to it must be reduced to 25%. Correction for this is done with a dimmer curve. For LEDs, the best curve is Inverse Square Law. For tungsten lamps, a true linear curve is best.
- DimX minus (-)
Every RC4 dimmer output has two terminals. The minus, or negative (-) terminal is the one that is being modulated by the dimmer electronics. The other is the plus, or positive (+) terminal.
- dmx universe
DMX data for lighting control is managed in sets of up to 512 channels. This is called a DMX universe. For more channels, multiple universes are utilized.
- Dongle
For RC4 Commander software to communicate wirelessly with remote RC4Magic devices, it needs an RC4 Dongle connected to your computer through a USB port. The dongle can be a dedicated device, like the RC4Magic XStick or 900MHz HG-Configuration Dongle , or it can be any RC4Magic device in dongle mode connected to the PC with an RC4 CodeLoader cable.
- dongle mode
For RC4 Commander to communicate wirelessly with an RC4Magic device, it needs another device in Dongle Mode connected to a computer with a CodeLoader cable.
Take the device desired to be the “dongle”, plug the 1/8″ jack into the DMX port on your device and the other end into a USB port on your computer. Apply power.
If using an IO Transceiver- Wait at least 5 seconds after powering on, tap the ID3 (public) button and wait for lights to trace(this will take several seconds), indicating that it is in Dongle Mode.
If using another RC4Magic device- Hold the Func button for several seconds until you see a rhythmic or asymmetrical blinking pattern of the COP light
Proceed to use Commander as usual
- E1. 37-1 RDM features
The original ANSI E1.20 Remote Device Management (RDM) specification outlines a bare-bones set of device parameters. Additional parameters that are useful for dimmer control were added with ANSI E1.37. RC4 devices support many of those additional features.
- firmware
The software that runs on a microprocessor inside a device is called firmware. RC4 Series 3 Harmonized Design devices can be updated anytime using an RC4 CodeLoader. It sends new firmware from a computer into the hardware of the RC4 device.
- Function button
Every RC4 Harmonized Design™ device provides a Function button, sometimes called the Func, Shift or Shift/Func button, to increase the number of available functions available with the other buttons.
The Func button also invokes CodeLoader mode when held down during power-up.
- grouping
Grouping is one of several parameters in RC4 Custom Pixel Profiles in DMXpix and LumenDimPix pixel drivers. It allows multiple physical pixels to be mapped to one control pixel. This is just one of several ways to control more pixels with fewer channels using patent-pending RC4 technology.
- ID 0
ID0 (zero) is the first of three unique codes provided for each RC4Magic owner, operator, or project. System IDs consist of four characters that can each be a letter or number, i.e 2876, 2F7D or DFAF. Although every system has it’s own three unique IDs, they are referred to generically as ID0, ID1, and ID2 on device labels and in documentation. Each ID supports a separate wireless DMX universe. Many IDs can be used simultaneously in the same space and cannot functionally interfere with each other.
- ID 0 button
The ID0 button, when held down during power up, selects the first private and unique digital system ID available in an RC4Magic device. This button serves other purposes after the device is powered on and is running normally. ID selection only happens when a button is held while power is applied to turn it on.
RC4Magic devices are programmed with 4 system ID codes. Three are private and unique for every owner, operator, or project, and the fourth is the Public ID. The Public ID is the same code on every RC4Magic device every made, allowing devices from any system to communicate with devices from any other system. The other IDs, Private ID0, ID1, and ID2, only allow communication between other devices with those same private codes. No other wireless DMX system from any manufacturer provides this level of data security. Even operating in the same room, multiple RC4 users can never functionally interfere with each other.
- ID 1
ID1 is the second of three unique codes provided for each RC4Magic owner, operator, or project. System IDs consist of four characters that can each be a letter or number, i.e 2876, 2F7D or DFAF. Although every system has it’s own three unique IDs, they are referred to generically as ID0, ID1, and ID2 on device labels and in documentation. Each ID supports a separate wireless DMX universe. Many IDs can be used simultaneously in the same space and cannot functionally interfere with each other.
- ID 1 button
The ID1 button, when held down during power up, selects the second private and unique digital system ID available in an RC4Magic device. This button serves other purposes after the device is powered on and is running normally. ID selection only happens when a button is held while power is applied to turn it on.
RC4Magic devices are programmed with 4 system ID codes. Three are private and unique for every owner, operator, or project, and the fourth is the Public ID. The Public ID is the same code on every RC4Magic device every made, allowing devices from any system to communicate with devices from any other system. The other IDs, Private ID0, ID1, and ID2, only allow communication between other devices with those same private codes. No other wireless DMX system from any manufacturer provides this level of data security. Even operating in the same room, multiple RC4 users can never functionally interfere with each other.
- ID 2
ID2 is the third of three unique codes provided for each RC4Magic owner, operator, or project. System IDs consist of four characters that can each be a letter or number, i.e 2876, 2F7D or DFAF. Although every system has it’s own three unique IDs, they are referred to generically as ID0, ID1, and ID2 on device labels and in documentation. Each ID supports a separate wireless DMX universe. Many IDs can be used simultaneously in the same space and cannot functionally interfere with each other.
- ID 2 button
The ID2 button, when held down during power up, selects the third private and unique digital system ID available in an RC4Magic device. This button serves other purposes after the device is powered on and is running normally. ID selection only happens when a button is held while power is applied to turn it on. Three-button RC4Magic devices do not have an ID2 button.
RC4Magic devices are programmed with 4 system ID codes. Three are private and unique for every owner, operator, or project, and the fourth is the Public ID. The Public ID is the same code on every RC4Magic device every made, allowing devices from any system to communicate with devices from any other system. The other IDs, Private ID0, ID1, and ID2, only allow communication between other devices with those same private codes. No other wireless DMX system from any manufacturer provides this level of data security. Even operating in the same room, multiple RC4 users can never functionally interfere with each other.
- ID 3
Every RC4Magic device can use a Public ID, numeric code 999, which is the same on every RC4Magic system ever made. The Public ID is sometimes identified as ID3 on device labels and in documentation — they are the same. Using the Public ID is the only way to use devices from different systems together. No other wireless DMX system from any manufacturer provides the level of system security provided by RC4Magic private and unique System IDs — even with other RC4 users operating systems in the very same room, functional interference between separately coded systems is impossible.
- ID 3 button
The ID3 button is also called the Public ID button. When held down during power up, it selects the Public ID, code 999, on an RC4Magic device. This button serves other purposes after the device is powered on and is running normally. ID selection only happens when a button is held while power is applied to turn it on.
RC4Magic devices are programmed with 4 system ID codes. Three are private and unique for every owner, operator, or project, and the fourth is the Public ID. The Public ID is the same code on every RC4Magic device every made, allowing devices from any system to communicate with devices from any other system. The other IDs, Private ID0, ID1, and ID2, only allow communication between other devices with those same private codes. No other wireless DMX system from any manufacturer provides this level of data security. Even operating in the same room, multiple RC4 users can never functionally interfere with each other.
- increment
To increase a quantity by a fixed numeric value.
- inverted ISL
The inverted ISL curve works backwards, with the highest level being off, and the lowest level being full. If two dimmers are assigned to the same DMX channel, one set to ISL and the other set to inverted ISL, they will smoothly cross-fade LEDs as the channel level changes. (Note that in this case it is not possible to turn both LEDs off. To overcome this, separate DMX channels would be used.)
- inverted linear
The inverted linear curve works backwards, with the highest level being off, and the lowest level being full. If two dimmers are assigned to the same DMX channel, one set to linear and the other set to inverted linear, they will cross-fade as the channel level changes. (Note that in this case it is not possible to turn both lamps off. To overcome this, separate DMX channels would be used.)
- ISL fast curve
LEDs do not dim linearly: when dimmed to a linear 50%, they appear only slightly less bright than at 100%. The level must drop to 25% to appear at half brightness. To make LEDs appear linear, they must be controlled with the Inverse Square Law curve. All good quality LED dimmers use this technique. RC4 also provides Digital Persistence (DP) to soften the rise and fall of LEDs when they dim. ISL Fast provides very fast DP, best for strobes and flashing that should appear instantaneous.
- ISL slow curve
LEDs do not dim linearly: when dimmed to a linear 50%, they appear only slightly less bright than at 100%. The level must drop to 25% to appear at half brightness. To make LEDs appear linear, they must be controlled with the Inverse Square Law curve. All good quality LED dimmers use this technique. RC4 also provides Digital Persistence (DP) to soften the rise and fall of LEDs when they dim. ISL Slow adds this feature to basic ISL response, making LEDs behave like traditional incandescent lamps.
- keyframe
Keyframes are a user-definable range of DMX channels used to create visual effects with pixel strings. The keyframe and the replication method are the core elements of patented RC4 Custom Pixel Profiles. A keyframe can use a fraction of a DMX universe and control hundreds of pixel LEDs with live creative control of the entire string remaining in the hands of the DMX console and operator.
- keyframe string
To better demonstrate how RC4 Custom Pixel Profiles (CPP) can control several long pixel strings using different sections of one DMX universe, a keyframe pixel string can be used. The keyframe string is configured for traditional 1:1 display of the entire DMX universe, showing the distribution and appearance of all the basic CPP keyframes within that universe.
- linear dimming curve
A linear dimming curve is directly proportional to the DMX channel value on a console. If the DMX channel is at 50%, the power being delivered to the light source will be 50%.
- load
Overall, load refers to something in an electrical circuit that will draw or consume power.
It is also typically the largest power draw in an electrical circuit.
- long-press
Buttons on RC4 Series 3 devices can invoke different features by operating the buttons in different ways. One way is to press and hold a button for several seconds. This is called a long-press.
When using long-press features, care must be taken to avoid accidentally slipping in a way that produces a button tap rather than long-press. When this happens, the feature that is assigned to a tap will be invoked, rather than the desired long-press function.
- non-dim curve
Some devices being controlled by a dimmer should only be turned on and off; gradations of dimming are inappropriate. Examples of these kinds are load are relays, solenoids, and pneumatic valves. In cases like this, a non-dim curve is used. The RC4 non-dim curve uses hysteresis to ensure the output will never unintentionally oscillate, even if the controlling DMX channel rises or falls very slowly or lingers near the center point.
- non-linear dimming curve
A non-linear dimming curve is also called a logarithmic dimming curve or dimming profile.
The non-linear dimming curve simulates the visual response of the human eye in regards to brightness perception, particularly with light sources that are not inherently linear on their own. There are a variety of non-linear dimming curves including Inverse Square Law (ISL), which is useful when working with LEDs and LED tape.
- OneTouch™
RC4 OneTouch™ uses DMX channel levels to represent channels and curves, which are then adopted by a dimmer when a single small button is pressed.
Back in 1993, James David Smith, chief product designer at RC4 Wireless, envisioned a day when wireless dimmers would be so small that there would be no room for rows of switches or rotary controls to set DMX channels. Today, the RC4Magic DMX2micro and LumenDimM2Micro are examples of his space-saving master plan fully realized.
The original OneTouch™ method permits selection of 4 common dimmer curves. Enhanced OneTouch™, introduced in late 2016, provides access to all the special dimmer curves in RC4 Series 3 devices, including inverted curves, servo motor control curves, and ac wave generation.
- pixel profiling
RC4 Custom Pixel Profiles™ is a patented method for controlling many pixels with fewer DMX channels than are needed for 1:1 mapping. For example, a typical pixel driver by others requires a full DMX universe (512 channels) to control 170 RGB pixels. Using RC4 pixel profiling, 1000 or more pixels can be controlled with less than a full universe, all completely under the control of the lighting designer and DMX console.
- pixel type
Pixel type is another way of saying LED pixel chip type. There are a variety of LED manufacturers who use various different pixel chips. The pixel type is identified by a series of letters and numbers, like WS2801 and APA102. Pixel LED chips vary in color depth, dimming smoothness, number of pixels that can be used in a series, the number of wires used to control them, and many other characteristics.
When working with RC4 dimmers, pixel types are identified and selected by their alphanumeric identifier. The most common type is WS2812 by World Semi. Some pixel chip types are compatible with others. For example, APA104 pixels can be controlled using the WS2812 setting in RC4 pixel drivers.
- Public ID
Every RC4Magic device can be configured to use the Public ID, numeric code 999, which is the same on every RC4Magic system ever made. Using the Public ID is the only way to use devices from different systems together. No other wireless DMX system from any manufacturer provides the level of system security provided by RC4Magic private and unique System IDs — even with other RC4 users operating systems in the very same room, functional interference between systems is impossible when they are using one of their three private system IDs.
- Public ID button
The Public ID button, when held down during power up, selects the Public ID, code 999, on an RC4Magic device. This button serves other purposes after the device is powered on and is running normally. ID selection only happens when a button is held while power is applied to turn it on.
RC4Magic devices with a three-button interface do not have a Public ID button. The Public ID is selected by holding both ID0 and ID1 simultaneously during power-up.
RC4Magic devices are programmed with 4 system ID codes. Three are private and unique for every owner, operator, or project, and the fourth is the Public ID. The Public ID is the same code on every RC4Magic device every made, allowing devices from any system to communicate with devices from any other system. The other IDs, Private ID0, ID1, and ID2, only allow communication between other devices with those same private codes. No other wireless DMX system from any manufacturer provides this level of data security. Even operating in the same room, multiple RC4 users can never functionally interfere with each other.
- PWM frequency
To see a visual representation and in-depth explanation of PWM, watch our latest video
This chart is also a helpful resource.
PWM stands for Pulse-Width Modulation. It is a method for using a switching device (one that can only be on or off) to create what appears to be analog changes in level. This is done by switching on and off at a high speed and varying the proportion of the time for each. For example, of the switch is on and off for equal periods, the result appears to be halfway between fully on and fully off.
To create a simple PWM dimmer output with the 8-bit (256 step) resolution of a DMX channel, a digital circuit continuously counts backwards from 255 down to zero, over and over again. On each restart, the switch is turned off. When the counter reaches the level of the channel, the switch is turned on. As long as this happens fast enough, you will see the average rather than a series of blinks or flickering.
The human eye stops seeing flicker and starts seeing smooth changes in level when the frequency gets up to 60 cycles per second, or 60Hz. Some people still see an odd trailing effect in their peripheral vision until the frequency is considerably higher, usually 500Hz or more.
Film and video cameras are more sensitive, because of the way they capture a series of still images (which works for the same reasons that PWM works!). It is important that several PWM switch cycles happen within the time that a single frame is being captured by a camera. Otherwise, some frames will see it and others will not, and this creates visible artifacts.
Increasing the number of values in the countdown will increase how long it takes to get through one cycle, but also provides more steps and higher resolution. Thus, reducing resolution allows higher PWM frequencies, while lower frequencies allow higher resolution. In general, dimming resolution is favored when eyes are viewing a dimmer directly, while frequency is favored when effects are being captured for film or video.
The PWM frequency on RC4 devices can be changed using the Set Buttons to find the optimal frequency for any given application. RC4Magic devices default to 615Hz (optimal for human eyes), while LumenDim and W-DIM devices default to 5kHz (optimal for typical video capture). All devices in all families can be set to 77Hz, 615Hz, 1.2kHz, 5kHz, 10kHz, 20kHz, and 40kHz. High frequencies provide lower resolution but are used for the very high frame rates that generate slow-motion imagery.
- RDM PID
Remote Device Management (RDM) is a protocol enhancement to USITT DMX512 that allows bi-directional communication between a lighting or system controller and attached RDM compliant devices over a standard DMX line. Various RDM features and commands are called Parameter Identifiers (PIDs). For example, to set a DMX channel with RDM, the PID for “set DMX channel” is used.
- relay
Simply put, a relay is an electronically operated switch. They open and close circuits electromechanically or electronically. A relay is easily controlled with an RC4 dimmer set to the non-dim dimmer curve. This curve avoids oscillation or buzzing in the relay by ensuring the channel can only be fully on or fully off.
- replication
RC4 Custom Pixel Profiles™ provide various methods for expanding and extending a keyframe of pixels beyond it’s basic length. These are replication methods. The simplest replication method copies the keyframe end to beginning, over and over again, for the length of the string.
- servo motor pulse
Hobby servo motors, like those made by Futaba, JR, and many others, are controlled using a short digital pulse. The length of this pulse controls position. RC4 offers a dimmer curve that provides this pulse, making it easy to control servo motors with any RC4 Series 3 dimmer output.
- Set A Button
All RC4 dimmers have Set buttons for each individual dimmer output. The first button is the Set A button.
On a 2-channel device these are Set A and Set B buttons.
A 4-channel device adds Set C and Set D.
The most common use of the Set button is to assign a DMX channel and dimmer curve to the associated DimX dimmer using RC4 OneTouch™; Set A is for the Dim A output, Set B for Dim B, and so on.
- Set B Button
All RC4 dimmers have Set buttons for each individual dimmer output. The second button is the Set B button.
On a 2-channel device these are Set A and Set B buttons.
A 4-channel device adds Set C and Set D.
The most common use of the Set button is to assign a DMX channel and dimmer curve to the associated DimX dimmer using RC4 OneTouch; Set A is for the Dim A output, Set B for Dim B, and so on.
- Set button
All RC4 dimmers have a Set button for each individual dimmer output. On a 2-channel device, these are SetA and SetB. A 4-channel device adds SetC and SetD.
The most common use of the Set button is to assign a DMX channel and dimmer curve to the associated Dim dimmer using RC4 OneTouch; SetA is for the DimA output, SetB for DimB, and so on.
- Set C Button
All RC4 dimmers have Set buttons for each individual dimmer output. The third button is the Set C button.
On a 2-channel device these are Set A and Set B buttons.
A 4-channel device adds Set C and Set D.
The most common use of the Set button is to assign a DMX channel and dimmer curve to the associated DimX dimmer using RC4 OneTouch; Set A is for the Dim A output, Set B for Dim B, and so on.
- Set D Button
All RC4 dimmers have Set buttons for each individual dimmer output. The fourth button is the Set D button.
On a 2-channel device these are Set A and Set B buttons.
A 4-channel device adds Set C and Set D.
The most common use of the Set button is to assign a DMX channel and dimmer curve to the associated DimX dimmer using RC4 OneTouch; Set A is for the Dim A output, Set B for Dim B, and so on.
- shift key
The shift key (or the shift button) is also called the Function or Func button. It works similarly to the shift key on a computer keyboard, allowing other buttons on a device to have secondary functions.
- smoothing time
RC4 Digital Persistence softens LED dimming to provide the appearance of incandescent lamps. This is done by introducing a smoothing time. To emulate larger traditional lamps, smoothing time is longer; to match the appearance of smaller lamps, a shorter time is used. For very fast blinks and strobes, no smoothing is introduced at all.
- streaming
Streaming is the continuous flow of digital control data. Transmitters stream data out, while receivers receive streamed data. RC4 transmitters process an incoming stream of DMX data and convert it to a proprietary wireless data stream that is secured with a digital system ID and error checking methods.
- System ID
RC4Magic devices are coded with unique system IDs to ensure the best possible data security. Three unique codes are provided for each new RC4Magic system. System IDs consist of four characters that can each be a letter or number, i.e 2876, 2F7D or DFAF. Although every system has it’s own three unique IDs, they are referred to generically as ID0, ID1, and ID2 when operating a system. In addition, every RC4Magic device can use a Public ID, numeric code 999, which is the same on every RC4Magic system ever made. Using the Public ID is the only way to use devices from different systems together. No other wireless DMX system from any manufacturer provides the level of system security provided by RC4Magic private and unique System IDs — even with other RC4 users operating systems in the very same room, functional interference between separately coded systems is impossible.
- tap point
A tap or tapping point is the physical place where a connection is made between the end terminals of an inductor, resistor, or some other component. A center-tap transformer places a physical wire, or tap, in the middle of one or both coils that are wrapped around an iron core.
- technology
This is the definition
- termination
In the context of wired DMX data, termination is a very specific technical requirement. To ensure the highest data fidelity, particularly over long cable lengths, a terminator should be used at the end of the line. RC4 DMXio devices provides internal termination that can be enabled or disabled as needed.
- track adapter
Track adaptors are devices that connect to Eutrac and other commercial track lighting systems. The RC4Magic DMXio-TR and RC4 Wireless LumenDimIO-TR are track adaptors that can deliver wireless DMX data to fixtures mounted on the track, or wirelessly transmit DMX data that is hard-wired and already present on the track.
- transmit mode
In transmit, or transmission mode, data from an RC4 device is sent to another device, like a remote receiver or dimmer device. In RC4Magic systems, a DMXio transceiver can be in either transmit or receive mode. A pair of devices, one in each mode, replaces a physical DMX cable.
- UL Listed
UL Listed products have passed government regulated safety tests performed by Underwriters Laboratories.
- user interface
The user interface (UI) is the physical hardware on a device that users interact with to configure settings, enable and disable features, see operational status, and more. The user interface on most small RC4 devices is comprised of recessed buttons and small LED indicators. More complex devices may use rotary controls, touch screens, and more.
- white balance
When white balancing, two or more different hues of white light are compared side by side and adjusted until they both are visually the same. Once all the white lights are adjusted to the same hue, all other colors coming from that specific light source (like an LED strip) will also be the same.